
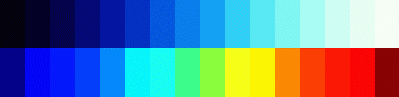
While the lower bar shows the corresponding colors themselves, the upper bar shows the integrated color, integrated from left to right, such that the resulting color becomes white. Clearly the 100nm rgb model is unattractive. It becomes a bit better with 50nm decomposition:

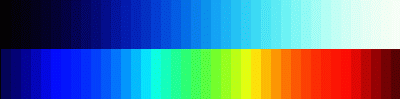
But even 50nm rarely is good enough to produce `smooth' colors for refracted, spectral-decomposed images. At least 25nm should be used:
25nm are ok for most `normal' situations. Nethertheless for extreme cases like direct views through a prisma, 10nm become necessary.
And just for comparision: This is the `exact' spectrum, with the wavelength computed for each pixel (with an gray scale of the same color intensity, spectral sensitivity according to the human eye):

It was not told yet that for a good spectrum not only the spectral resolution
is essential, but also the used spectral sensitivity for each color.
For the above spectra and the following raytracing simulations, a Gauss function
(
The spectral color sensitivity is defined via the Spectral class in <3D/spectrum.hpp>. Any spectral behaviour may be defined by overloading the virtual member functions double Spectral::operator()(double lambda) and double Spectral::operator()(double lambda1, double lambda2), with the second function beeing the integral of the first one, i.e. the error function if the spectral sensitivity is the Gauss function. These classes may be used directly for raytracing also.
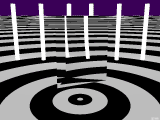
| A first simulation shows a standard scenery with white neon bars shining through a glass prisma on a spherical zebra-horizont, grey in grey due to the colorless objects. |
|
| When the prisma is rotated, somewhen the case of total reflection occurs, as visible in this monochrome simulation. |
|
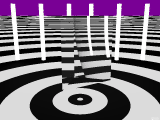
| Now when dispersion is `switched on', the refracted images of the neon bars split up into colorized ones. Here the refraction indices are 1.49, 1.50, 1.51 for red, green, blue respectively. |
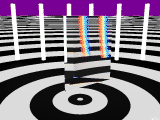
|
| Such a low refraction is quite unrealistic. Using the more realistic values of (1.45,1.5,1.55) with a spectral resolution of a mere 10nm the dispersed images are split up quite a lot. |
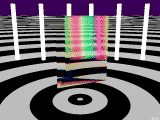
|
|
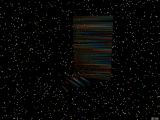
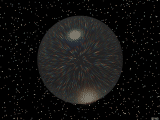
Raytracing dispersed pointlike objects is much more sensitive to
spectral resolution than raytracing extended sources like neon bars.
If the spectral resolution is too rough, there will be no smooth spectrum
but an ensemble of images of the same object, each for one of the scanned
wavelength. For this star-prisma simulation a spectral resolution of 1nm was used, each view ray is split up into 400 rays when entering the first refractive surface! |
|
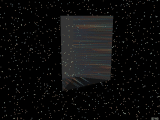
| Since the prisma itself is hardly visible in the former simulation, some additional light source was used here to enlighten the prisma's glass surfaces (it's not perfectly transparent). |
|
| Why always use triangular plane prismas? It's also effectful to see a sphere dispersing the star light. Something like a radial prisma. Here also a spectral resolution of 1nm was used. |
|
| Now back to some `earth-near' scenery: 40 glass spheres with dispersion in front of a zebra-horizont (please ignore the far aliasing effects), rendered with 10nm spectral resolution. |

|
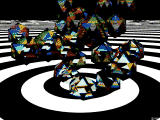
| And, at last: 40 dispersive ikosaeders colorizing the grey horizont (ikosaeders lying at the same positions as the spheres in the above image). |
|